Tuesday, February 23, 2010

How To Removed Right Click In my Blog

These days I write about How To Removed Right Click In my Blog!, This article was made because I want to protect this blog from people who want to copy the article in it, although I realize a lot of people I post articles here.

Part of people may be able to do copypaste articles from my blog the other way. but at least it can provide some protection against the writing in this blog.


The following are ways to protect this writing.
Step 1
: Go to Dashboard > Layout > Add Gadget > HTML / JavaScript
Step 2 : Copy the following code and paste it there .

Step 3
: Save the html/javascript and view you blog.


<script language="JavaScript">
<!--

//Disable right mouse click Script

var message="I has been remove right click in this blog!";

///////////////////////////////////
function clickIE4(){
if (event.button==2){
alert(message);
return false;
}
}

function clickNS4(e){
if (document.layers||document.getElementById&&!document.all){
if (e.which==2||e.which==3){
alert(message);
return false;
}
}
}

if (document.layers){
document.captureEvents(Event.MOUSEDOWN);
document.onmousedown=clickNS4;
}
else if (document.all&&!document.getElementById){
document.onmousedown=clickIE4;
}

document.oncontextmenu=new Function("alert(message);return false")

// -->
</script>


when you try to do right click on your blog will display the message '"I has been remove right click in this blog!", good luck. leave your comment:)
Read More

Thursday, February 18, 2010

How to Removed FAKE ANTIVIRUS

This is not new news, but this important for you, you can read this... check this out :)

There is a new fake antivirus software, this time is it known as Antivirus Live. Unlike other fake antivirus, Antivirus Live was created with the intention of cheating you out of your money by making you believe that your computer is infected with lots of virus, imaginary non-existence viruses. You are then scared into buying a ’solution’, what you need to do now is to remove this antivirus.

Below is a simple step by step tutorial on how to remove Antivirus Live:

How To Remove Fake Antivirus Live Software


  • Download SuperAntiSpyware and MalwareBytes.
  • Reboot your computer into safe mode.
  • Install SuperAntiSpyware and perform a deep scan.
  • Reboot your computer into safe mode again when you’re done with SuperAntiSpyware.
  • Install MalwareBytes and perform a full system scan
  • Reboot again and install a good antivirus, Microsoft Security Essentials is a good choice.

p.s. Make sure you scan your thumbdrive too, in most cases, the virus will copy itself to the thumbdrive.
p.s. never download and install unknown antivirus software.

You may want to try the following antivirus – Free 90 Days Norton Internet Security and Antivirus 2010 and Avira AntiVir Free


Source : http://www.geckoandfly.com
Read More

Wednesday, February 17, 2010

Best User Antivirus People in the world

NOD AntiVirus

NOD32 earns accolades from users and experts for effectiveness and performance. Reports say that software conflicts are rare and that the program won't noticeably slow down your computer. Virus protection is first-rate
according to tests. The user interface notably improved in the previous version, and version 4 brings further improvements, making NOD32 easy to use. Unlike most antivirus software, user reaction and satisfaction is very positive.


Best antivirus software

pros
  • Excels at preventing viruses
  • Low system drain
  • No software conflicts
  • Improved user interface
cons
  • Doesn't include firewall protection
  • Relatively expensive

*-------------------------------------------------------------------------------*

AVG AntiVirus

Professional reviewers conclude that AVG Anti-Virus Free Edition is the best of the free antivirus programs, and it is handily the most popular as well. No substantial reviews compare free and commercial programs, but reviews of the commercial version of AVG provide one yardstick. That program fares poorly when compared with Norton and NOD32, among others. AVG and other free programs offer much less user control than commercial programs, but users swear they work. If you're diligent and careful about your personal security practices, free antivirus software might be enough.


Free Antivirus Software

pros

  • Free
  • More effective than other free software
cons
  • Not as customizable as paid antivirus programs
  • No tech support
*-------------------------------------------------------------------------------*

Norton Antivirus

Security suites bundle antivirus and anti-spyware software, a firewall and other components into a single program. Reviewers like Norton's Internet Security 2009's new simplified interface and the fact that most operations occur seamlessly in the background. User reviews indicate that it's quick to install with minimal impact on system performance. The biggest advantage of using a security suite instead of separate antivirus, firewall, anti-spyware and other security applications is that the potential for software conflicts is eliminated. However, reviewers note that Norton is best used as a standalone application; users report conflicts with other brands of security software.


Security suite with antivirus software

pros
  • Excellent virus detection
  • Fast and easy to use
  • Free online support
  • Suite minimizes conflicts with other security programs
cons
  • Poor anti-spam performance
  • Frustrating technical support
  • Parental control is a separate download

Read More

Keep Secure your Ubuntu

As a system administrator, one of your chief tasks is dealing with server security. If your server is connected to the Internet, for security purposes, it's in a war zone. If it's only an internal server, you still need to deal with (accidentally) malicious users, disgruntled employees and the guy in accounting who really wants to read the boss's secretary's e-mail.

In general, Ubuntu (and expecially Ubuntu) Server is a very secure platform. The Ubuntu Security Team, the team that produces all official security updates, has one of the best turnaround times in the industry. Ubuntu ships with a no open ports policy, meaning that after you install the machine -- be it an Ubuntu desktop or a server -- no applications will be accepting connections from the Internet by default. Like Ubuntu desktops, Ubuntu Server uses the sudo mechanism for system administration, eschewing the root account. And finally, security updates are guaranteed for at least 18 months after each release (five years for some releases, like Dapper), and are free.

In this section, we want to take a look at filesystem security, system resource limits, dealing with logs and finally some network security. But Linux security is a difficult and expansive topic; remember that we're giving you a crash course here, and leaving a lot of things out -- to be a good administrator, you'll want to learn more.

User Account Administration

Many aspects of user administration on Linux systems are consistent across distributions. Debian provides some convenience tools, such as the useradd command, to make things easier for you. But since Ubuntu fully inherits Debian's user administration model, we won't go into detail about it here. Instead, let us refer you to the O'Reilly Web site for the basics. After reading that page, you'll have full knowledge of the standard model, and we can briefly talk about the Ubuntu difference: sudo.


Ubuntu doesn't enable the root, or administrator, account by default. There is a great deal of security benefit to this approach and incredibly few downsides, all of which are documented at the man pages for sudo_root.

The user that you add during installation is the one who, by default, is placed into the admin group and may use sudo to perform system administration tasks. After adding new users to the system, you may add them to the admin group like this:

$ sudo adduser username admin

Simply use deluser in place of adduser in the above command to remove a user from the group.

One thing to keep in mind is that sudo isn't just a workaround for giving people root access. It can also handle fine-grain permissions, such as saying, "allow this user to execute only these three commands with superuser privileges."

Documentation about specifying these permissions is available in the "sudoers" man page, which can be a bit daunting -- feel free to skip close to the end of it, until you reach the EXAMPLES section. It should take you maybe 10 or 15 minutes to grok it, and it covers a vast majority of the situations for which you'll want sudo. When you're ready to put your new knowledge to use, simply run:

$ visudo

Be careful here -- the sudoers database, which lives in /etc/sudoers, is not meant to just be opened in an editor, because an editor won't check the syntax for you! If you mess up the sudoers database, you might find yourself with no way to become an administrator on the machine.

Filesystem Security

The security model for files is standardized across most Unix-like operating systems, and is called the POSIX model. The model calls for three broad types of access permissions for every file and directory: owner, group and other. It works in exactly the same way on any Linux distribution, which is why we won't focus on it here. For a refresher, consult the man pages for chmod and chown, or browse around the Internet.

We want to actually look at securing partitions through mount options, an oft-neglected aspect of dealing with system security that's rather powerful when used appropriately. When explaining how to partition your system, we extolled the virtues of giving, at the very least, the /home, /tmp and /var directories their own partitions, mentioning how it's possible to use special options when mounting these to the filesystem.

Many of the special mount options are filesystem-dependent, but the ones we want to consider are not. Here are the ones that interest us:

nodev A filesystem mounted with the nodev option will not allow the use or creation of special "device" files. There's usually no good reason to allow most filesystems to allow interpretation of block or character special devices, and allowing them poses potential security risks.

nosuid If you read up about Unix file permissions, you know that certain files can be flagged in a way that lets anyone execute them with the permissions of another user or group, often that of the system administrator. This flag is called the setuid (suid) or the setgid bit, respectively, and allowing this behavior outside of the directories that hold the system binaries is often unnecessary and decreases security. If a user is able to, in any way, create or obtain a suid binary of his own choosing, he has effectively compromised the system.

noexec If a filesystem is flagged as noexec, users will not be able to run any executables located on it.

noatime This flag tells the filesystem not to keep a record of when files were last accessed. If used indiscriminately, it lessens security through limiting the amount of information available in the event of a security incident, particularly when computer forensics is to be performed. However, the flag does provide performance benefits for certain use patterns, so it's a good candidate to be used on partitions where security is an acceptable trade-off for speed.

Deciding which mount options to use on which partition is another fuzzy science, and you'll often develop preferences as you become more accustomed to administering machines. Here's a basic proposal, though, that should be a good starting point:
• /home-nosuid, nodev
• /tmp-noatime, noexec, nodev, nosuid
• /var-noexec, nodev, nosuid

System Resource Limits

By default, Linux will not impose any resource limits on user processes. This means any user is free to fill up all of the working memory on the machine, or spawn processes in an endless loop, rendering the system unusable in seconds. The solution is to set up some of your own resource limits by editing the /etc/security/limits.conf file:

$ sudoedit /etc/security/limits.conf

The possible settings are all explained in the comment within the file, and there are no silver bullet values to recommend, though we do recommend that you set up at least the nproc limit, and possibly also the as/data/_memlock/rss settings.

TIP: A Real-Life Resource Limit Example

Just to give you an idea of what these limits look like on production servers, here is the configuration from the general login server of the Harvard Computer Society at Harvard University:

as 2097152 data 131072 memlock 131072 rss 1013352 hard nproc 128

This limits regular users to 128 processes, with a maximum address space of 2GB, maximum data size and locked-in-memory address space of 128MB, and maximum resident set size of 1GB.

If you need to set up disk quotas for your users, install the quota package, and take a look at its man page.

System Log Files

As a system administrator, the system log files are some of your best friends. If you watch them carefully, you'll often know in advance when something is wrong with the system, and you'll be able to resolve most problems before they escalate.

Unfortunately, your ability to pay close attention to the log files dwindles with every server you're tasked with administering, so administrators often use log processing software that can be configured to alert them on certain events, or write their own tools in languages such as Perl and Python.

Logs usually live in /var/log, and after your server runs for a while, you'll notice there are a lot of increasingly older versions of the log files in that directory, many of them compressed with gzip (ending with the .gz filename extension).

Here are some log files of note:
• /var/log/syslog - general system log
• /var/log/auth.log - system authentication logs
• /var/log/mail.log - system mail logs
• /var/log/messages - general log messages
• /var/log/dmesg - kernel ring buffer messages, usually since system bootup

Your Log Toolbox

When it comes to reviewing logs, there are a few tools of choice that you should become familiar with. The tail utility prints, by default, the last ten lines of a file, which makes it a neat tool to get an idea of what's been happening last in a given log file:

$ tail /var/log/syslog

With the -f parameter, tail launches into follow mode, which means it'll open the file and keep showing you changes on the screen as they're happening. You can now easily recreate the Hollywood hacker movie staple: text furiously blazing across the screen.

Also invaluable are zgrep, zcat and zless, which operate like their analogues that don't begin with a "z" but on gzip-compressed files. For instance, to get a list of lines in all your compressed logs that contain the word "warthog" regardless of case you would issue the following command:

$ zgrep -i warthog /var/log/*.gz

Your toolbox for dealing with logs will grow with experience and based on your preferences, but to get an idea of what's already out there, do an apt-cache search for "log files."

A Sprinkling of Network Security

Network security administration is another feature provided largely by the OS, so it's no different on Ubuntu than on any other modern Linux distribution. That means we won't cover it here but will leave you with a pointer.

The iptables command is the front end to the very powerful Linux firewall tables. Unfortunately, dealing with iptables can be rather difficult, particularly if you're trying to set up complex firewall policies. To whet your appetite, here's iptables in action, dropping all packets coming from a notorious time-sink domain:

$ sudo iptables -A INPUT -s www.slashdot.org -j DROP

Tutorials, how-tos, and articles about iptables are available on the Internet in large numbers, and the system man pages provide detailed information about all the possible options. Spending some time to learn iptables is well worth it, because it'll let you set up network security on any Linux machine, and will make it pretty easy for you to learn other OS firewall systems if need be.

Final Words on Security

We've barely even scratched the surface of system security in this article, though we've tried to give you good pointers on where to start and where to get the information you need to learn more. But let us give you some sage advice on security in general, since it's a painful truth to learn: There is no such thing as a fully secure system. Securing systems isn't about making it impossible for a breach to occur. It's about making the breach so difficult that it's not worth it to the attacker. This definition is pretty fluid, because if your attacker is a bored 14-year-old sitting in a basement somewhere chewing on cold pizza, you can bet that he'll leave your system alone if it's even marginally secure. But if you're keeping around top secret information, then it's a lot more difficult to have the system be secure enough that breaking into it isn't worth it, from a cost/benefit point of view, to the attackers.

Security is also neat because, as a concept, it permeates the entire idea space of computer science. Getting really good at security requires incredibly deep understanding of the inner workings of computer systems, which has the nonobvious advantage that if you're trying to get a deep understanding of computer systems but don't know where to start, you can start with security and simply follow the trail. Use this to your advantage!

Source: August 24, 2006 (Computerworld) -- This article is excerpted from The Official Ubuntu Book by Benjamin Mako Hill, Jono Bacon, Corey Burger, Jonathan Jesse and Ivan Krstic, copyright Prentice Hall. Reprinted with permission of Prentice Hall, all rights reserved.

Read More

Tuesday, February 16, 2010

ALL Command "DIR" in DOS PROMPT

DIR command is a DOS command that serves to display the files in a drive or folder is active.

This command is similar to the Copy command in the previous posts both on the run from the prompt drive.
This command is most often used for those who are accustomed to dealing with Command Prompt, do not continue to read, but for those who are unfamiliar please read carefully and try to practice the commands I give here.

Before executing the command DIR there are some things that must be understood as an active drive, the current folder.
Active Drive is the drive currently being accessed, as well as the folder is a folder that is used or diakes today.
How to do I know if the folder is active or being accessed at this time? Here's how to explain my logic, Suppose you from windows click Start - Run then type cmd and press enter when the cursor is (the sign minus karakater shaped guide flashing) is at C:\Document and Settings\user> then the current drive is now drive C and the current folder is the folder \Documents and Settings\ and sub folders on the \user>. and \user> usually can be changed to another name as a user in your computer.

So if you give DIR command (the command with a lowercase letter may be all), then all files and directories that display the files and folders in the sub folder \User>.

Various forms of DIR command, try the command (yellow) as the experimental materials and the early exercise to try in windows directory and then run the command below, do type the command: cd \windows and press Enter.

DIR and press command to display all files and all extensions

DIR *.* Enter, the command to display all files and all extensions

DIR? O *.* Enter, the command to display the file name from the left second letter is the letter O and the subsequent extensions free encyclopedia

DIR?? M *.* enter, the command to display the files from the left third letter is the letter m and the free extension

DIR *. c * Enter, the command to display the files and free the file name extension first letter is the letter C

DIR? O *. c * Enter, the command to display the file name both the letter of the file name is the letter O and the first letter of the extension is the letter c

DIR ?????.* Enter command to display the file names that only have 5 (five marks) or smaller letters, and free extensions

DIR *.?? Enter, the command to display files with the file name extensions freely while only 2 (two) letters only.

Maybe that's part of DIR command I can give, for later you can try with variations wildcards (special caracter * and?) On the DIR command to suit your needs.

Good luck with your practice with DOS commands
Read More

Monday, February 15, 2010

How to looking for bad sectors in your hard drive

Your computer slow? or even frequently hangs? if it happens, there are many causes that can cause your computer to be slow in part because infected by the virus, the data stored on the hard disk capacity is too large for example in the form of films, photographs, while also could be because your hard disk sector is bad already, so the data access process occurs when the computer is in turn susceptible to interference on the bad sectors so that the process of reading or writing data on hard disk media to be slow due to bad sectors affected by this.
There are several ways to find out whether we have hard disks with bad sectornya or not, can use the DOS command CHKDSK as in our practice today or could also use a software utility like Partision Magic, or any other.
As I gave at the top that this time we try to do simple checks on your hard disk to see our state of the hard disk is really healthy or being sick (sick with bad sectors...)


Perform the following ways to check on your hard disk.
From Windows, click Start menu - All Programs - Accessories - Command Prompt or it could be a way Click the Start Menu - Run, then type CMD and enter. The second command above to lead us to the window or command prompt window.

Command Prompt by typing the command CHKDSK C: (orders must use small or large letters the same) and then enter, this command to find out or check the hard disk in drive C. Note the picture below.


Press Enter and show like this picture :


From the image above to inform the form:

  1. Total Disk Space, stated the maximum amount of capacity hard disk
  2. N Hiden Files (n declare certain value), said scale capacity used by the files hidden (the hidden files are usually files the operating system)
  3. N Folders, said the number of folders that are in a drive
  4. N Files, declare n / number of files inside a single drive
  5. Bad Sector, said the number of bytes affected by bad sectors in a drive (if 0 (zero) bytes means your hard drive is healthy and the bar is greater than 0 (zero), then your hard disk already exists Bad Sector him so watch out for the the bad sector data is the possibility of damage can occur at any time)
  6. Available, stated hard disk capacity in a single drive that can still be used to store data.

Lets try guys :)
Read More

Thursday, February 11, 2010

How to disable Autorun In Drive Computer

we must have a lot of what's known computer viruses and computer viruses are often spread through a kind of intermediary data traveler flash disk or CD games and the like. computer viruses are very dangerous if we are not able to control its spread. and now all that can be a bit overcome by disabling the autorun in flash disk or a frequent traveler data connected with our computers.

The following are steps to disable this autorun:

Disable Auto Run drive cd rom or flash disk


1. Click the Start button - Run.
2. Type gpedit.msc and press OK.
3. Click on User Configuration - Administrative Templates - System.
4. Click 2x on the Turn Off Autoplay.
5. Click on the Enable option.
6. At the option Turn off Autoplay on, select All drives.
7. Click OK.
8. Done.

good luck guys :)
Read More

Excel Tutorial Part. 2

This time we will start by creating a table in Microsoft Office Excel, before starting I explain a little about the CELL. Tues where the intersection between the column and row, for example, you place the pointer at the C column and row to the four it would read "pointer is on C4 cells".

Okay now let's start with our lesson today is to get a table.

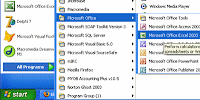
First run your Microsoft Office Excel by clicking Start - All programs - Microsoft Office - Microsoft Office Excel 2003 (for those who use another version of Microsoft Office such as Microsoft Office 97, Microsoft Office 2000, Office XP Office Microsoft, not a problem). note the following images :


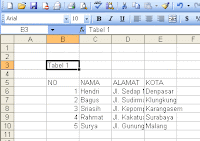
After the worksheets are in Microsoft Office Excel, make a table like the following picture:


How:
Place the pointer on the cell B3 and then type in Table 1 and Enter
Next place the pointer on cell B5 and typing NO then Enter
The next step place the pointer in cell B6 and type the numbers 1 (do this step until the cell B10 to make Number Sort).

After a number Sort, now we make a column name, the way same way over the place the pointer on the right C5 No. column on the right.
Do this until the complete address and the City so the result will look like the picture above.

When finished making the table above, now we must set the column width to fit the width of the data (text / number) that the inputs on each of each cell.
The trick is:
Because here we are just changing the column width for the placement of the pointer must be akolom pad that will be changed in size, while the line-free. Suppose you want to change the width of column B aka pointer must be in column B and the line could be in line 1, 2, 3 and so on until the very last row.

Change column Table 1 above that you created with the following sizes:
Column B: 4.43
Column C: 12
Column D: 22
Column E: 12
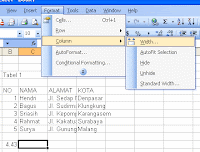
How: to change the width of column B, place the pointer in cell B1 or B2 or B3, and so on and then click the Format menu - Column - Width, and then enter or type the number for the column width of 4.43 and press Enter. View images :


After changing the width of column B, then change the width of column C = 12, D = E = 22 and 12 do follow the way to change the width column B above.

After all, save the file with the file name TABEL1.XLS, by clicking File Menu - Save As and then typing the name TABEL1 file and click save.
Read More

Monday, February 8, 2010

Repair registry editor in Your Computer

Your PC is just like a machine, the defense needs to be working in perfect condition. And, one of the most significant jobs you have to do is regular maintenance to repair your registry. Windows Registry on your computer is a file cabinet, storing all the information the Windows operating system plus application system. But as the filing system, when the cabinet is often dismantled pairs of its contents, at some point he will become a mess and rubbish everywhere. If it so it becomes increasingly difficult to detect computer information necessary to do the job efficiently. Archiving registry repair computer software, identify the files that are no longer required is routine work to be done.

Windows already has a way to remove the garbage that is not valid in the registry, called the Registry Editor or regedit. This application allows you to view and delete registry entires that are not valid anymore. Unfortunately, unlike the clear office files are labeled, is not easy to know and often have strange names such as HKEY_CURRENT_USER MicrosoftWord Applications that do not indicate if they are needed or not, then you do not know if it is safe or not to delete it. In fact, even more profesionalpun computer users will not use regedit to clean the registry. They rely on software from third-party developers.

Registry repair software is best to not only to remove rubbish from the registry, it must also correct errors that always arise. Such errors occur when, for example, a program installed and uninstalled but uninstalled junk files are still there, aka accumulate. When finished scanning, the software should indicate the file is invalid and obvious errors, so you can make good decisions if the key is removed or left alone.

When deciding which registry repair software is best for you, you should use criteria such as user-friendly, easy installation and a short time, feature set and support and help available in everyday language understandable to the user. And most significantly, the use of cleaning must have security features such as backup function that allows you to restore the registry to a previous state in case of important files accidentally deleted.

Some registry repair software best available as a free download, so you do not need to invest money to make this vital maintenance tasks. But if you're willing to take the commercial registry software is also good because it'll make other important system changes, there are free trial versions that you can get to test. If you find a registry cleaner that allows you to run a scan of their site without downloading, you may be able to test their software. After you finally select the registry repair software is best and right for your computer skill level, always make sure you have backed up your registry and all the important information in your drive.
In conclusion, treating the registry was not easy then you need software registry. Good luck!
Read More

Showing the screen saver tab is hidden

While my blog suddenly appeared a short message on my Hanphone coming from one of our friend loyal blog visitors Computer Science Learning which was about to ask a question that occurs to the laptop.

The problems presented by him that the screen saver on his laptop missing alias does not appear in the display properties.

Problems like this myself yet know exactly what caused the problem but the truth is a screen saver may be lost due to accidentally disabled person may also own a friend who was idly toying with you. If the screen savernya accidentally or lost due to accidental by the person to return the matter was simple.
What is meant by a screen saver here is the Screen Saver tab is shown in the Display properties window is not a screen saver view or display a screen saver.

Screen Saver tab can be displayed or it can also be hidden, it is very helpful in keeping our computers not as good for people to change the settings of personal computers let alone computers. What if the screen saver is modified by someone else using the object, image or pornographic images or images that are not feasible. It's changed back to display the screen saver is not difficult, but if this will be done in the workplace by fellow idle and eventually it caught the boss can be a big deal.

In order not to get to the green table mending the Screen Saver tab to hide it. To hide or display the Screen Saver tab again please follow the following way:

  1. Click the Start menu and select Run
  2. Type gpedit.msc and press ENTER / OK to enter the Group Policy window
  3. Click the sign + (plus) on the left User Configuration
  4. Click the + sign on the left Administrative Templates
  5. Click the + sign on the left Control Panel
  6. Click Dipsplay
  7. In the right window double-click on the Hide Screen Saver tab to go to the Hide Screen Saver Tab Properties
  8. Select Enabled to display the Screen Saver tab
  9. Select Disabled to hide the Screen Saver tab (select sala one no. 8 or No. 9)
  10. Click OK
  11. Close the window Tab Screen Saver Hide Properties
  12. Close the Group Policy window
  13. Done
Easy is not how to display the screen saver tab is missing or hide screen saver tab. Good luck hopefully useful. [compsecured.blogspot.com]
Read More

How To Booting From CD-Rom change BIOS Setup

Once the software installation on computers made by using the floppy, but this time was much different that using the compact disk (CD). Cd can be stored in many kinds of programs and drivers.

Because now all programs are stored on the CD then the boot process must also be through the cd, but the problem is setting the BIOS (basic input / output system) to the default state does not lead to a cd rom boot, so there are still many who do not know how to change the boot order in the BIOS so the CD is the first priority when booting.

To enter the BIOS menu different way someone using DEL key is using the F2 function key and others are using a variation of 2 key on the keyboard, but it can be seen in the bios first read and seen on the monitor.

If the boot process too quickly, so you do not have time to read or even press the button to enter the bios then you should press the Pause / Break on your keyboard to pause the boot process, this is done so that we could read the instructions that can be done to get into Hereinafter in the BIOS menu.

In this article we use the DEL key is more common today.
Initial steps to enter the BIOS menu is blaming a computer, by pressing the computer power, note the blinking lights on the keyboard then press the DEL key multiple times with the intention that you are not late pressing the DEL.

Once inside the BIOS menu menu note Advanced BIOS Features option, there are First Boot Device option. Drag the cursor and place it on the First Boot Device selection and do a boot media by using a plus sign (+) or minus (-). Because at this time we practice to boot using the cd then choose the CD-ROM as first boot media.

The next step is to click Esc on your keyboard to exit the BIOS menu Advaced Feature and primary human return to the BIOS. From the BIOS main menu select Save & Exit Setup and then select Y (yes) and press Enter to exit the BIOS menu and do Booting.

Now your computer will always read the cd-rom as the boot process on your computer that you made the change, if you want to restore booting from the cd-rom to your hard disk, then step into the same setupnya BIOS and change the First Boot Device to Hard disk.
Read More

How To Hide Drive Computer? Check This Out

There are many ways to secure data is not easily found by other computer users. Let's say there is no data in the form of photographs or documents for adults who do not deserve shown to the children would have to hide it so as not easily be found by the children. The father of a laptop may be used by the children but of course there is a limit not to the father discovered the secret of all.
Frequently used way is by protection of file or folder by giving password, but this way is still considered very inconvenient because every time you open a file or folder must be busy with typing a password.

for us computer users is very important data so that every person who has the data will always try to keep data safe from interference perceived hands ignorant. Moreover, these data are confidential data.

Here is one way to avoid the reach of children from the secret files in order not to consume the children.


Follow these steps to hide a hard disk drive.

Prior to hide drives are advised to make a special drive to store files that are considered confidential, which will be hidden drive let's say the drive is drive D: \>

Suppose that the computer has 3 fruits such as drive A drive (Floppy disk), drive C (Hard Disk C) and Drive D (Hard Disk D)

Of the three drives that would be hidden on the D drive (hard disk D).

Way as follows:

Click the Start menu, Run and type gpedit.msc and press ENTER or click OK.
Click the + (plus) on the left User Configuration
Click the + sign on the left Administrative Templates
Click the + sign next to the left of the Windows Components
Click Windows Explorer
Double-click thesive Hide specified drives in My Computer
On the Settings tab select the Enable
Click OK

Close Windows Explorer and refresh or restart your computer and reopen Windows Explorer, then dive which had been hidden will not be visible.
Even if the file does not seem to drive but to open the drive is not difficult because only with type D: and then press ENTER then the D drive will appear.

A few tips from the blog Learning Computer Science this time to hide the drive and hopefully useful.
Read More

Friday, February 5, 2010

Excel Tutorial Part. 1

Introduction to Microsoft Office 2003

What is microsoft Office Excel? Microsoft Office Excel is a spreadsheet program or the software company's issued by microsoft. Application program features the calculations and graphs.

Workbook to know Microsoft Office Excel
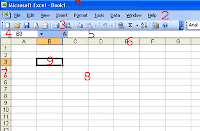
Consider the following picture and read the information below in accordance with the serial number which I gave a red color.


  1. Title Bar / Line Title, the title bar microsoft office excel to display the name of the program being used is Microsoft Office Excel and Book1 workbook states that 1 (one).
  2. Menu Bar / Line menu, where the menus can be used in office excel micrsoft
  3. Tool Bar / Line Tool (components), the components or the commands represented by the images a certain image to help users to more quickly excel in their work
  4. Name Box / box name, said the active cell, for example, are on bari pointer to column 2 to B then the Name Box displays the B2
  5. Formula Bar / Line Formula, a line to display or type of formulas or typed formulas in the worksheet
  6. Column / Column, line stating that the columns in the beginning of Alphabet A through IV
  7. Row / Line, which states the order of lines starting from 1 to 65,535
  8. Workspace / Worksheet, the area where tables are used to make calculations or graphs
  9. Pointer, rectangular box or a dark color called pointer states of cells (cell) is active for typing something into the worksheet.
  10. Sheet, said the order page working, if the white sheet sheet / page is active and when the writing sheet of gray is not the active sheet.
  11. Status Bar / Line Status, which provides line information about the use of microsoft excel, and information pengggunaan keys / keyboard keys
Read More

Thursday, February 4, 2010

how to change unwritable be writable in joomla

In accordance with the title of this article is configuration.php unwritable, is a problem sometimes encountered in managing the website made with joomla. Incidentally today I experienced it myself that I can not make improvements or changes to the joomla global settings.

because I finally found the problem started surfing with Google, known for its speed in finding something of information and ultimately the results of my surfing led to a result so I can change the status of configuration.php to unwritable once can I change them to writable.

To find out how to change the configuration.php writable joomla to follow tips to change permissions on the following cpanel.


After finding the file, the name kllik configuration.php file and then look at the window located on the right there is the option Show the file, Delete File, Edit File, Change Permissions, Rename Files, Copy File, Move File. Because we want to change the permissions then click on Change Permissions.


then came the default configuration.php as shown in the picture below :


Change like this :
After giving a check mark or contreng an empty box, the last step is to make storage configuration.php file by clicking on the Change.

Logout from cpanel and then try again to edit and do global storage settings. Global settings can be edited and updated.

Good Luck :)
Read More

Dos command to format the hard drive and other drives in Your Computer!!

The following is an example command to format the hard disk, flash disk, floppy disk on the computer, reading good friends.

FORMAT volume [/FS:file-system] [/V:label] [/Q] [/A:size] [/C] [/X]
FORMAT volume [/V:label] [/Q] [/F:size]
FORMAT volume [/V:label] [/Q] [/T:tracks /N:sectors]
FORMAT volume [/V:label] [/Q] [/1] [/4]
FORMAT volume [/Q] [/1] [/4] [/8]
  • volume : Specifies the drive letter (followed by a colon), mount point, or volume name.
  • /FS : filesystem Specifies the type of the file system (FAT, FAT32, or NTFS).
  • /V : label Specifies the volume label.
  • /Q : Performs a quick format.
  • /C : Files created on the new volume will be compressed by default.
  • /X : Forces the volume to dismount first if necessary. All opened handles to the volume would no longer be valid.
  • /A : size Overrides the default allocation unit size. Default settings are strongly recommended for general use. NTFS supports 512, 1024, 2048, 4096, 8192, 16K, 32K, 64K. FAT supports 512, 1024, 2048, 4096, 8192, 16K, 32K, 64K, (128K, 256K for sector size > 512 bytes). FAT32 supports 512, 1024, 2048, 4096, 8192, 16K, 32K, 64K, (128K, 256K for sector size > 512 bytes). Note that the FAT and FAT32 files systems impose the following restrictions on the number of clusters on a volume : FAT: Number of clusters <= 65526, FAT32 : 65526 <>
  • /F:size : Specifies the size of the floppy disk to format (160, 180, 320, 360, 640, 720, 1.2, 1.23, 1.44, 2.88, or 20.8).
  • /T : tracks Specifies the number of tracks per disk side.
  • /N : sectors Specifies the number of sectors per track
  • /1 : Formats a single side of a floppy disk.
  • /4 : Formats a 5.25-inch 360K floppy disk in a high-density drive.
  • /8 : Formats eight sectors per track.
Read More

Safari Review From My blog :)

Safari browser is the browser that comes from Mac OS. but now can be used in the operating system safe to use and windows.Safari fast enough, because we know that firefox is the main windows operating system.

but safari better than firefox in Mac OS versions, because safari can work well in windows operating system, then he has added value.


But the shortcomings are in the safari browser if we do open new tab will feel very heavy compared to firefox that not many java / display against.

Another deficiency is that the tool in the safari options are incorporated in different IExplore with Firefox. good but not the best in windows operating system:)
Read More

Partition Magic 8.0, How to increase hard disk partitions?

Partitioning your hard disk by using the operating system was used and was often done while to partition the hard disk after the operating system is installed there are still newbies who have not tried it from that article is very useful for beginners who want to add a partition on the computer hard disk using Partition Magic 8.0 .

To get started, please create a new partition start partition magic 8.0 in your PC.

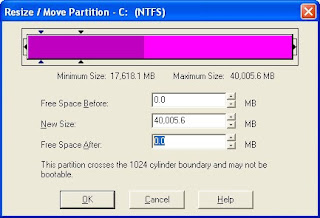
Once inside the Window Partition Magic, the next step is to click the C drive partition and then the Operations tab click the Partition Resize / Move partition resizing windows so that they appear / Move Partition as the following picture :


type size of space (MB) is needed in Free Space Free Space Before or After. To use free space free space before or after depending on whether we plan to place the new partition before or after the c drive c drive, where to put the new partition before the c drive then type the amount of space to free space before and when to put the new partition after c drive then type the amount of space on the free space after.

For example here I put a new partition after my drive c then type in the amount space for 15,000 MB of Free Space After then click OK.


after typing a number of bytes the size of hard disk partition view would be like the following picture:


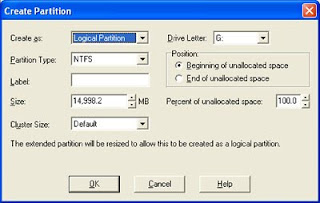
Click on the partition that had just added and then click Create Partition to Partition Operations tab so that the Create Partition window appears.
Change the options in accordance with needs such as Primary Partition or Logical Partition, Drive Letter, Partition Type (FAT / NTFS), Size. Here I explain to create a logical drive so just click OK without making any changes to create the windows partition.


After click OK then the overall result of the hard disk partition will look like the following picture which has added a new drive called the drive G.


After the partition is complete next mark is the last operation is to click Apply at the Pending Operations tab so that all pending operations is completed. When you click Apply then the message will appear Apply Changes consisting of 3 choices are Yes if you agree to continue the process, then select No if you did not continue the process and select the details to see a detailed process that we have done and are still in pending. Click Yes because we want to continue the process ..


If you Need to restart your computer, you can restart now for take new effect. now! The process adding a new partition on a computer that already installed windows operating system is complete. good luck!!
Read More

Wednesday, February 3, 2010

Thumbs.db, what is this?

sometimes we get a folder in a file that is hidden, and we think it is a virus, but what exactly "Thumbs.db" let us see the explanation.

The default behavior for many folders in Windows XP is to display thumbnail images of the files in the folder. This is primarily true of folders created from digital cameras or filed under the My Videos and My Pictures folders. Thumbs.db is Microsoft's way of caching thumbnail images of any image or movie file in a folder. The idea behind creating a thumbnail cache is to improve the speed of displaying thumbnails the next time you open the folder by caching a set of thumbnails for the image and video files in the folder. If you hadn't seen this file in your folders previously it's likely you didn't have Show hidden files and folders enabled. Deleting the Thumbs.db file simply deletes that cache, which is regenerated the next time you view the folder contents. It is possible to configure Windows to never cache thumbnails.

Howard asks, "I just recently noticed that in any of my picture or video clip files a (Data Base File) called thumbs has recently appeared. When I delete it, it reappears. It was never there before. I noticed it after a couple of updates from Microsoft. What heck does it do? It doesn't seem to effect my ability to see the img or mvi pics, etc."

One of the biggest annoyances to the Thumbs.db file is the way it changes folder settings. You can specifically set all folders in Windows to open in Detail view, for instance. If any folder contains a Thumbs.db file, that folder reverts to the thumbnail view, ignoring your preferences.

To turn off thumbnail caching, open Tools > Options in Windows Explorer and click on the View tab. Check the box next to Do not cache thumbnails and click OK.


Read More
Designed By Seo Blogger Templates